Let's make a game in Java
|
So, there are many tutorials that will help you make a video game.
Some of them only require 10 easy steps! How do they work?
Well, they give you some ready-made almost-complete pieces of a game, and have you put them together.
What do you learn? You learn how to make a game when someone provides ready-made almost-complete pieces that just need to be snapped together.
This tutorial will guide you to make a simple video game in straight Java, from scratch! If you can write a video game, then you can write almost any software (with plenty of time, and a good search engine, and some willingness to skim tutorials as needed). Will following these steps turn you into a computer programmer? Maybe. If you follow them absent-mindedly and just copy the answers, then probably not. But, here's the material--let's see what you can get out of it... | 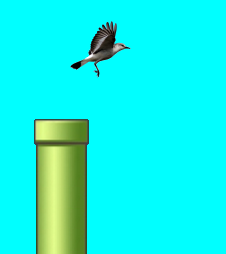 |
Lecture videos that accompany these instructions
- Make sure you have a recent version of the JDK (Java Development Kit) installed. Find, download, and install NetBeans (or, any other IDE--they all do pretty-much the same stuff, and any would be fine.)
Click for more explicit instructions.
If you use Ubuntu
sudo apt-get install openjdk-8-jdk
or, if you want the official Oracle version:sudo add-apt-repository ppa:webupd8team/java sudo apt-get update sudo apt-get install oracle-java8-installer
or use a search engine to find other ways to do it. (When these instructions become out-of-date, please yell at me so I will know to update them.)If you use Windows
Download and install it. Get the JDK (Java Development Kit), not the JRE (Java Runtime Environment). The JDK includes the compiler (javac). the JRE does not include the compiler. You don't need the "Development Kit with Demos and Samples", just get the "Development Kit". Unless your computer is really old, you probably want the 64-bit version. (When these instructions become out-of-date, please yell at me so I will know to update them.)
If you are planning to become a serious programmer, I'd recommend switching to Linux. The sooner you do that, the less painful the transition will be.If you use Mac
I don't know. I don't have a Mac. When you figure it out, please tell me how to do it so I can update these instructions. - Open NetBeans (or your favorite IDE). Start a new project. Call it "Grid". (That will mean something later.)
Click to see a screen shot.

- A computer is an instruction following machine. You write the instructions. It does them.
But, computers are not (yet) very intelligent. So, you must give your instructions in a language that it understands,
and you must make your instructions very precise. The first command to learn is "System.out.println".
It prints a message (usually to the screen). For example, if you want the computer to print "squeamish ossifrage",
then you would give a command like this:
System.out.println("squeamish ossifrage");Yes, you have to put parentheses around your text, just like that. Yes, you have to end your command with a semi-colon. Why? Because computers are still not as smart as people. They panic when you don't do it exactly like they expect.
Okay, now you try. Make your program print "Hello world!"
When you think you have done it, push the "Build" button. (It has a picture of a hammer on it.) If there are no errors, then press the "Run" button. (It looks like a VCR "Play" button.)
(The answer is below. See if you can do it yourself before you look at the answer.)Click to see the answer.
package grid;

class Grid
{
	public static void main(String[] args)
	{
		System.out.println("Hello world!");
	}
}
"Wait a minute!", you might say, "You didn't even explain all the other (non-red) text. And, you didn't tell me where to put the command! Did you just expect me to know what to do?"
Yes, there are lots of details to cover. If your questions are not answered to your satisfaction within a few steps, please ask lots of questions. - Take a little time to inject errors into your code, and see what messages the compiler gives to you.
For example, try omitting the ";" at the end of the line. Try changing "main" to "Main".
Try removing a line. Try adding some superfluous garbage.
Press the "hammer" button to attempt to build your broken code.
See if you can understand how the compiler's message describes what you did.
Why did we do this?
Learning how to understand the error messages that the compiler gives you is an important part of programming. Later, when you make real mistakes, it will be a lot easier to figure out what the compiler means if you have already spent some time fiddling with it.
- In Java, "System.out.print" and "System.out.println" do similar but slightly different things. The first one just prints a message.
The second one also adds a newline character at the end.
("newline" is a special character that returns the cursor to the start of the next line.)
Practice by using two commands to print "Hello world!", instead of just one.Click to see the answer.
package grid;

class Grid
{
	public static void main(String[] args)
	{
		System.out.print("Hello");
		System.out.println(" world!");
	}
}
What good is that? Well, sometimes you can't print a whole line all at once. For example, see the next problem. - Good job. Next, we'll learn about "for" loops. For example, the following code will print "0, 1, 2, 3, 4, ":
for(int i = 0; i < 5; i++)
{
	System.out.print(i);
	System.out.print(", ");
}
Now, print "Hello world!" one thousand times. (No, don't try to copy-and-paste 1000 copies of the print command. That could work, but come on, practice using a "for" loop.)Click to see the answer.
package grid; class Grid { public static void main(String[] args) { for(int i = 0; i < 1000; i++) { System.out.print("Hello"); System.out.println(" world!"); } } } - Good job. Now, use a "for" loop to write code to print 50 "#" symbols.
Add a newline character at the end. (If you don't know what a "newline" character is, please repeat the previous two steps.)
To do this task, you will need to know how to make a "for" loop in Java.
You will also need to know how to use "System.out.print" and "System.out.println".
Click to see the answer.
package grid;

class Grid
{
	public static void main(String[] args)
	{
		for(int i = 0; i < 50; i++)
			System.out.print("#");
		System.out.println("");
	}
}
You could also write it like this, if you prefer:package grid; class Grid { public static void main(String[] args) { for(int i = 0; i < 50; i++) { System.out.print("#"); } System.out.println(""); } }The braces are optional. If you leave them out, the computer assumes you meant to put them around the ONE command that follows the "for" loop. If you want to put more than one command in the loop, you had better use braces. - Good job. Now, write code to print a whole grid of "#" symbols. Make it 20 rows high and 50 rows wide.
To do this task, you will need to know how to make a "for" loop in Java.
You will also need to know how to use "System.out.print" and "System.out.println".
Click to see the answer.
package grid; class Grid { public static void main(String[] args) { for(int j = 0; j < 20; j++) { for(int i = 0; i < 50; i++) System.out.print("#"); System.out.println(""); } } } - Variables let us give names to the values we use.
Using variables effectively can make code much easier to read.
When someone uses a number without giving it a name, we call that a "magic number".
(Magic is bad because it works, but no one understands how.)
Get rid of the "magic numbers" in your code by creating variables for the width and height of the grid.
To do this task, you will need to create and use two new variables.
Click to see the answer.
package grid; class Grid { public static void main(String[] args) { int width = 50; int height = 20; for(int j = 0; j < height; j++) { for(int i = 0; i < width; i++) System.out.print("#"); System.out.println(""); } } } - In Java, "=" assigns a value to a variable.
By contrast, "==" tests whether a variable has a value. Here is a bad example:
int date == 13;    // NO! WRONG! EW! STOP NOW!
if(date = 13)      // ACK! BAD! BAD! NEVER DO THIS!
	System.out.println("Oh no, it's an unluky day");
Here is a good example:int date = 13; // Correctly assign date to hold the value 13. if(date == 13) // Correctly tests whether date is 13. System.out.println("Oh no, it's an unluky day");(By the way, you also just learned how to use "if" statements, and how to add comments to code.)
Now, make all the characters in column 23 of your grid be spaces instead of '#' characters.Click to see the answer.
package grid;

class Grid
{
	public static void main(String[] args)
	{
		int width = 50;
		int height = 20;
		for(int j = 0; j < height; j++)
		{
			for(int i = 0; i < width; i++)
			{
				if(i == 23)
					System.out.print(" ");
				else
					System.out.print("#");
			}
			System.out.println("");
		}
	}
}
Oh yeah, I didn't tell you about "else". Well, you get it now. "else" is for what you want to otherwise want to happen. - In Java, "||" means "or", and "&&" means "and". You can use these in "if" statements to make more complex expressions. Example:
if(day == 5 && date == 13)
	System.out.println("Oh noes, it's Friday the 13th!");
Without using more than one "if" statement in your whole program, make all the characters in row 7 be spaces and make all the characters in column 23 be spaces instead of '#' characters.Click to see the answer.
package grid; class Grid { public static void main(String[] args) { int width = 50; int height = 20; for(int j = 0; j < height; j++) { for(int i = 0; i < width; i++) { if(i == 23 || j == 7) System.out.print(" "); else System.out.print("#"); } System.out.println(""); } } } - By changing only two characters in your code,
make the grid to contain 20 rows and 50 columns of '#' characters,
except there should be a single space (as a hole in the grid) at row 7, column 23.
Click to see the answer.
package grid; class Grid { public static void main(String[] args) { int width = 50; int height = 20; for(int j = 0; j < height; j++) { for(int i = 0; i < width; i++) { if(i == 23 && j == 7) System.out.print(" "); else System.out.print("#"); } System.out.println(""); } } } - Oh no, now there are magic numbers in our code again.
Please get rid of them.
Click to see the answer.
package grid; class Grid { public static void main(String[] args) { int width = 50; int height = 20; int x = 23; int y = 7; for(int j = 0; j < height; j++) { for(int i = 0; i < width; i++) { if(i == x && j == y) System.out.print(" "); else System.out.print("#"); } System.out.println(""); } } } - Please modify your code to print 15 blank lines before it draws the grid.
Click to see the answer.
package grid;

class Grid
{
	public static void main(String[] args)
	{
		int width = 50;
		int height = 20;
		int x = 23;
		int y = 7;
		for(int i = 0; i < 15; i++)
			System.out.println("");
		for(int j = 0; j < height; j++)
		{
			for(int i = 0; i < width; i++)
			{
				if(i == x && j == y)
					System.out.print(" ");
				else
					System.out.print("#");
			}
			System.out.println("");
		}
	}
}
What is that for? ...you'll see. - Now, make your entire program execute 100 times!
Click to see the answer.
package grid; class Grid { public static void main(String[] args) { for(int frame = 0; frame < 100; frame++) { int width = 50; int height = 20; int x = 23; int y = 7; for(int i = 0; i < 15; i++) System.out.println(""); for(int j = 0; j < height; j++) { for(int i = 0; i < width; i++) { if(i == x && j == y) System.out.print(" "); else System.out.print("#"); } System.out.println(""); } } } } - Move your 4 variable declarations outside of the main loop.
This won't actually change any behavior,
but it will make your program slightly more efficient,
since there is no need to do that part 100 times.
Click to see the answer.
package grid; class Grid { public static void main(String[] args) { int width = 50; int height = 20; int x = 23; int y = 7; for(int frame = 0; frame < 100; frame++) { for(int i = 0; i < 15; i++) System.out.println(""); for(int j = 0; j < height; j++) { for(int i = 0; i < width; i++) { if(i == x && j == y) System.out.print(" "); else System.out.print("#"); } System.out.println(""); } } } } - Put the computer to sleep for 0.5 seconds each time after you draw the grid.
(Don't worry about why, yet. You will see why in the next step.)
Here is some code to put the computer to sleep for 0.5 seconds:
try
{
	java.lang.Thread.sleep(500);
}
catch(Exception e)
{
	e.printStackTrace(System.err);
	System.exit(1);
}
Click to see the answer.
package grid; class Grid { public static void main(String[] args) { int width = 50; int height = 20; int x = 23; int y = 7; for(int frame = 0; frame < 100; frame++) { for(int i = 0; i < 15; i++) System.out.println(""); for(int j = 0; j < height; j++) { for(int i = 0; i < width; i++) { if(i == x && j == y) System.out.print(" "); else System.out.print("#"); } System.out.println(""); } try { java.lang.Thread.sleep(500); } catch(Exception e) { e.printStackTrace(System.err); System.exit(1); } } } } - In Java, you can increment a variable by putting "++" after the variable name.
(Increment means to add one to it.)
Increment the horizontal and vertical position of the space character
after the program sleeps. This should result in an animated picture.
Click to see the answer.
package grid; class Grid { public static void main(String[] args) { int width = 50; int height = 20; int x = 23; int y = 7; for(int frame = 0; frame < 100; frame++) { for(int i = 0; i < 15; i++) System.out.println(""); for(int j = 0; j < height; j++) { for(int i = 0; i < width; i++) { if(i == x && j == y) System.out.print(" "); else System.out.print("#"); } System.out.println(""); } try { java.lang.Thread.sleep(500); } catch(Exception e) { e.printStackTrace(System.err); System.exit(1); } x++; y++; } } } - This code is getting rather hard to read.
Please annotate it with comments.
Click to see the answer.
package grid; class Grid { public static void main(String[] args) { // Initialize program values int width = 50; int height = 20; int x = 23; int y = 7; // Animate for 100 frames for(int frame = 0; frame < 100; frame++) { // Draw some blank lines between frames for(int i = 0; i < 15; i++) System.out.println(""); // Draw a grid of '#' characters for(int j = 0; j < height; j++) { for(int i = 0; i < width; i++) { if(i == x && j == y) System.out.print(" "); else System.out.print("#"); } System.out.println(""); // end of line } // Sleep for a half second try { java.lang.Thread.sleep(500); } catch(Exception e) { e.printStackTrace(System.err); System.exit(1); } // Move the space x++; y++; } } } - Let's move that sleep code into a separate function.
Click to see the answer.
package grid; class Grid { static void take_a_nap(int miliseconds) { try { java.lang.Thread.sleep(miliseconds); } catch(Exception e) { e.printStackTrace(System.err); System.exit(1); } } public static void main(String[] args) { // Initialize program values int width = 50; int height = 20; int x = 23; int y = 7; // Animate for 100 frames for(int frame = 0; frame < 100; frame++) { // Draw some blank lines between frames for(int i = 0; i < 15; i++) System.out.println(""); // Draw a grid of '#' characters for(int j = 0; j < height; j++) { for(int i = 0; i < width; i++) { if(i == x && j == y) System.out.print(" "); else System.out.print("#"); } System.out.println(""); // end of line } // Sleep for a half second take_a_nap(500); // Move the space x++; y++; } } } - Add variables to represent the horizontal and vertical velocities of the space.
(For now, set them both to 1. We will change them in the next step.)
Click to see the answer.
package grid; class Grid { static void take_a_nap(int miliseconds) { try { java.lang.Thread.sleep(miliseconds); } catch(Exception e) { e.printStackTrace(System.err); System.exit(1); } } public static void main(String[] args) { // Initialize program values int width = 50; int height = 20; int x = 23; int y = 7; int vx = 1; int vy = 1; // Animate for 100 frames for(int frame = 0; frame < 100; frame++) { // Draw some blank lines between frames for(int i = 0; i < 15; i++) System.out.println(""); // Draw a grid of '#' characters for(int j = 0; j < height; j++) { for(int i = 0; i < width; i++) { if(i == x && j == y) System.out.print(" "); else System.out.print("#"); } System.out.println(""); // end of line } // Sleep for a half second void take_a_nap(500); // Move the space x += vx; y += vy; } } } - Make the animated space bounce off of the walls of the grid.
(This will require you to use 4 if statements to check for collisions with each of the 4 edges.)
Click to see the answer.
package grid; class Grid { static void take_a_nap(int miliseconds) { try { java.lang.Thread.sleep(miliseconds); } catch(Exception e) { e.printStackTrace(System.err); System.exit(1); } } public static void main(String[] args) { // Initialize program values int width = 50; int height = 20; int x = 23; int y = 7; int vx = 1; int vy = 1; // Animate for 100 frames for(int frame = 0; frame < 100; frame++) { // Draw some blank lines between frames for(int i = 0; i < 15; i++) System.out.println(""); // Draw a grid of '#' characters for(int j = 0; j < height; j++) { for(int i = 0; i < width; i++) { if(i == x && j == y) System.out.print(" "); else System.out.print("#"); } System.out.println(""); // end of line } // Sleep for a half second void take_a_nap(500); // Bounce off of the walls of the grid if(x >= width) vx = -1; if(y >= height) vy = -1; if(x <= 0) vx = 1; if(y <= 0) vy = 1; // Move the space x += vx; y += vy; } } } - This code is getting a bit unwieldy, don't you think?
A "class" is a construct for keeping code organized in relatively small chunks.
(Using classes won't make your code smaller, but it will help to make it more organized.)
As a stretch challenge, see if you can make this program easier to read by making a separate class for the ball.
There are a lot of concepts, here, so please just open up the answer and let's chat about it.
See how much you can understand, and please ask lots of questions about the rest.
Click to see the answer.
package grid; import java.lang.Thread; class Ball { int x; int y; int xvel; int yvel; Ball() { x = 22; y = 6; xvel = 1; yvel = -1; } void move() { x += xvel; y += yvel; } void bounce(Grid g) { if(x >= g.width || x <= 0) xvel = -xvel; if(y >= g.height || y <= 0) yvel = -yvel; } } public class Grid { int width; int height; Grid() { width = 60; height = 20; } static void go_to_sleep(int milisecs) { try { Thread.sleep(milisecs); } catch(Exception e) { e.printStackTrace(System.err); System.exit(1); } } void draw(Ball b) { for(int j = 0; j < height; j++) { for(int i = 0; i < width; i++) { if(i == b.x && j == b.y) { System.out.print(" "); // put a blank space at (x,y) } else { System.out.print("#"); } } System.out.println(""); } } public static void main(String[] args) { // Set initial program values final int spacing = 15; // Allocate two objects Grid grid = new Grid(); Ball ball = new Ball(); // The main loop. Animate the space character while(true) { for(int z = 0; z < spacing; z++) System.out.println(""); grid.draw(ball); go_to_sleep(150); ball.bounce(grid); ball.move(); } } } - You should probably back up your work at this point.
No one ever regrets making too many backups. Plenty of people regret not making enough backups.
It has been said that there are two types of computer users:
- Those who have already learned the importance of making regular backups, and...
- those who are about to.
Click for the slightly funny yet eerily poignant punch line.
- Now, let's start over with a new project where we can tinker with classes a little bit.
Click to see the answer.
package shapes; public class Shapes { public static void main(String[] args) { } } - Add a new class named Point
Click to see the answer.
package shapes; class Point { } public class Shapes { public static void main(String[] args) { } } - Add meaningful member variables to your Point class
Click to see the answer.
package shapes; class Point { double x; double y; } public class Shapes { public static void main(String[] args) { } } - Add a constructor that takes two parameters to initialize the member variables.
Click to see the answer.
package shapes; class Point { double x; double y; Point(double initial_x, double initial_y) { x = initial_x; y = initial_y; } } public class Shapes { public static void main(String[] args) { } } - If you want to make a new Point, you need to use the keyword "new". Example:
Point p = new Point(1.5, 2.0);
Let's do that in your main method.Click to see the answer.
package shapes; class Point { double x; double y; Point(double initial_x, double initial_y) { x = initial_x; y = initial_y; } } public class Shapes { public static void main(String[] args) { Point p = new Point(1.5, 2.0); } } - Make another class called Rect. (A Rect should have 2 vertices for the top-left corner and the bottom-right corner. Use your Point class for the vertices.)
Click to see the answer.
package shapes; class Point { double x; double y; Point(double initial_x, double initial_y) { x = initial_x; y = initial_y; } } class Rect { Point topLeft; Point bottomRight; } public class Shapes { public static void main(String[] args) { Point p = new Point(1.5, 2.0); } } - Add a constructor to your Rect class that takes no parameters and initializes to have unit size (that is, a width of 1 and a height of 1.)
Click to see the answer.
package shapes; class Point { double x; double y; Point(double initial_x, double initial_y) { x = initial_x; y = initial_y; } } class Rect { Point topLeft; Point bottomRight; Rect() { topLeft = new Point(0.0, 0.0); bottomRight = new Point(1.0, 1.0); } } public class Shapes { public static void main(String[] args) { Point p = new Point(1.5, 2.0); } } - Add a method to your Rect class that computes the area of your rectangle.
Click to see the answer.
package shapes; class Point { double x; double y; Point(double initial_x, double initial_y) { x = initial_x; y = initial_y; } } class Rect { Point topLeft; Point bottomRight; Rect() { topLeft = new Point(0.0, 0.0); bottomRight = new Point(1.0, 1.0); } double area() { double width = bottomRight.x - topLeft.x; double height = bottomRight.y - topLeft.y; return width * height; } } public class Shapes { public static void main(String[] args) { Point p = new Point(1.5, 2.0); } } - Instantiate a Rect object in your main method. Also, print its area.
Click to see the answer.
package shapes; class Point { double x; double y; Point(double initial_x, double initial_y) { x = initial_x; y = initial_y; } } class Rect { Point topLeft; Point bottomRight; Rect() { topLeft = new Point(0.0, 0.0); bottomRight = new Point(1.0, 1.0); } double area() { double width = bottomRight.x - topLeft.x; double height = bottomRight.y - topLeft.y; return width * height; } } public class Shapes { public static void main(String[] args) { Point p = new Point(1.5, 2.0); Rect rectina = new Rect(); double arina = rectina.area(); System.out.print("The area of rectina is "); System.out.println(arina); } } - Add a method that enables you to stretch a Rect object horizontally and vertically by adding specified values to its width and height.
Click to see the answer.
package shapes; class Point { double x; double y; Point(double initial_x, double initial_y) { x = initial_x; y = initial_y; } } class Rect { Point topLeft; Point bottomRight; Rect() { topLeft = new Point(0.0, 0.0); bottomRight = new Point(1.0, 1.0); } double area() { double width = bottomRight.x - topLeft.x; double height = bottomRight.y - topLeft.y; return width * height; } void stretch(double horiz, double vert) { bottomRight.x += horiz; bottomRight.y += vert; } } public class Shapes { public static void main(String[] args) { Point p = new Point(1.5, 2.0); Rect rectina = new Rect(); double arina = rectina.area(); System.out.print("The area of rectina is "); System.out.println(arina); } } - Instantiate a second Rect object in your main method. Stretch it, and print its area too.
Click to see the answer.
package shapes; class Point { double x; double y; Point(double initial_x, double initial_y) { x = initial_x; y = initial_y; } } class Rect { Point topLeft; Point bottomRight; Rect() { topLeft = new Point(0.0, 0.0); bottomRight = new Point(1.0, 1.0); } double area() { double width = bottomRight.x - topLeft.x; double height = bottomRight.y - topLeft.y; return width * height; } void stretch(double horiz, double vert) { bottomRight.x += horiz; bottomRight.y += vert; } } public class Shapes { public static void main(String[] args) { Point p = new Point(1.5, 2.0); Rect rectina = new Rect(); double arina = rectina.area(); System.out.print("The area of rectina is "); System.out.println(arina); Rect rectifer = new Rect(); rectifer.stretch(2.0, 3.0); double arifer = rectifer.area(); System.out.print("The area of rectifer is "); System.out.println(arifer); } } - Add another class called Triangle, and give it meaningful member variables.
Click to see the answer.
package shapes; class Point { double x; double y; Point(double initial_x, double initial_y) { x = initial_x; y = initial_y; } } class Rect { Point topLeft; Point bottomRight; Rect() { topLeft = new Point(0.0, 0.0); bottomRight = new Point(1.0, 1.0); } double area() { double width = bottomRight.x - topLeft.x; double height = bottomRight.y - topLeft.y; return width * height; } void stretch(double horiz, double vert) { bottomRight.x += horiz; bottomRight.y += vert; } } class Triangle { Point a; Point b; Point c; } public class Shapes { public static void main(String[] args) { Point p = new Point(1.5, 2.0); Rect rectina = new Rect(); double arina = rectina.area(); System.out.print("The area of rectina is "); System.out.println(arina); Rect rectifer = new Rect(); rectifer.stretch(2.0, 3.0); double arifer = rectifer.area(); System.out.print("The area of rectifer is "); System.out.println(arifer); } } - Add yet another class called Shape. (Put it above your Rect and Triangle classes.)
Click to see the answer.
package shapes; class Point { double x; double y; Point(double initial_x, double initial_y) { x = initial_x; y = initial_y; } } class Shape { } class Rect { Point topLeft; Point bottomRight; Rect() { topLeft = new Point(0.0, 0.0); bottomRight = new Point(1.0, 1.0); } double area() { double width = bottomRight.x - topLeft.x; double height = bottomRight.y - topLeft.y; return width * height; } void stretch(double horiz, double vert) { bottomRight.x += horiz; bottomRight.y += vert; } } class Triangle { Point a; Point b; Point c; } public class Shapes { public static void main(String[] args) { Point p = new Point(1.5, 2.0); Rect rectina = new Rect(); double arina = rectina.area(); System.out.print("The area of rectina is "); System.out.println(arina); Rect rectifer = new Rect(); rectifer.stretch(2.0, 3.0); double arifer = rectifer.area(); System.out.print("The area of rectifer is "); System.out.println(arifer); } } - In Java, you can make a class inherit from another class using the "extends" keyword.
Make your Rect and Triangle classes inherit from Shape.
Click to see the answer.
package shapes; class Point { double x; double y; Point(double initial_x, double initial_y) { x = initial_x; y = initial_y; } } class Shape { } class Rect extends Shape { Point topLeft; Point bottomRight; Rect() { topLeft = new Point(0.0, 0.0); bottomRight = new Point(1.0, 1.0); } double area() { double width = bottomRight.x - topLeft.x; double height = bottomRight.y - topLeft.y; return width * height; } void stretch(double horiz, double vert) { bottomRight.x += horiz; bottomRight.y += vert; } } class Triangle extends Shape { Point a; Point b; Point c; } public class Shapes { public static void main(String[] args) { Point p = new Point(1.5, 2.0); Rect rectina = new Rect(); double arina = rectina.area(); System.out.print("The area of rectina is "); System.out.println(arina); Rect rectifer = new Rect(); rectifer.stretch(2.0, 3.0); double arifer = rectifer.area(); System.out.print("The area of rectifer is "); System.out.println(arifer); } } - Add a member variable to the Shape class called "type" that holds a string.
(Now, both Rect and Triangle will have types.)
Click to see the answer.
package shapes; class Point { double x; double y; Point(double initial_x, double initial_y) { x = initial_x; y = initial_y; } } class Shape { String type; } class Rect extends Shape { Point topLeft; Point bottomRight; Rect() { topLeft = new Point(0.0, 0.0); bottomRight = new Point(1.0, 1.0); } double area() { double width = bottomRight.x - topLeft.x; double height = bottomRight.y - topLeft.y; return width * height; } void stretch(double horiz, double vert) { bottomRight.x += horiz; bottomRight.y += vert; } } class Triangle extends Shape { Point a; Point b; Point c; } public class Shapes { public static void main(String[] args) { Point p = new Point(1.5, 2.0); Rect rectina = new Rect(); double arina = rectina.area(); System.out.print("The area of rectina is "); System.out.println(arina); Rect rectifer = new Rect(); rectifer.stretch(2.0, 3.0); double arifer = rectifer.area(); System.out.print("The area of rectifer is "); System.out.println(arifer); } } - In your Rect class, initialize the type to "rectangle". In your Triangle class, initialize the type to "Triangle".
Click to see the answer.
package shapes; class Point { double x; double y; Point(double initial_x, double initial_y) { x = initial_x; y = initial_y; } } class Shape { String type; } class Rect extends Shape { Point topLeft; Point bottomRight; Rect() { type = "rectangle"; topLeft = new Point(0.0, 0.0); bottomRight = new Point(1.0, 1.0); } double area() { double width = bottomRight.x - topLeft.x; double height = bottomRight.y - topLeft.y; return width * height; } void stretch(double horiz, double vert) { bottomRight.x += horiz; bottomRight.y += vert; } } class Triangle extends Shape { Point a; Point b; Point c; Triangle() { type = "triangle"; } } public class Shapes { public static void main(String[] args) { Point p = new Point(1.5, 2.0); Rect rectina = new Rect(); double arina = rectina.area(); System.out.print("The area of rectina is "); System.out.println(arina); Rect rectifer = new Rect(); rectifer.stretch(2.0, 3.0); double arifer = rectifer.area(); System.out.print("The area of rectifer is "); System.out.println(arifer); } } - Add some print statements to demonstrate that you can print the types of some shape objects.
Click to see the answer.
package shapes; class Point { double x; double y; Point(double initial_x, double initial_y) { x = initial_x; y = initial_y; } } class Shape { String type; } class Rect extends Shape { Point topLeft; Point bottomRight; Rect() { type = "rectangle"; topLeft = new Point(0.0, 0.0); bottomRight = new Point(1.0, 1.0); } double area() { double width = bottomRight.x - topLeft.x; double height = bottomRight.y - topLeft.y; return width * height; } void stretch(double horiz, double vert) { bottomRight.x += horiz; bottomRight.y += vert; } } class Triangle extends Shape { Point a; Point b; Point c; Triangle() { type = "triangle"; } } public class Shapes { public static void main(String[] args) { Point p = new Point(1.5, 2.0); Rect rectina = new Rect(); double arina = rectina.area(); System.out.print("The area of rectina is "); System.out.println(arina); Rect rectifer = new Rect(); rectifer.stretch(2.0, 3.0); double arifer = rectifer.area(); System.out.print("The area of rectifer is "); System.out.println(arifer); System.out.print("rectina is a "); System.out.println(rectina.type); System.out.print("rectifer is a "); System.out.println(rectifer.type); Triangle trina = new Triangle(); System.out.print("trina is a "); System.out.println(trina.type); } } - Great! Now, let's start a new project named "game".
(This one will become the game we are trying to make!)
Here is a small amount of code to jump-start this new project:// ------------------------------------------------------------- // The contents of this file are dedicated to the public domain. // (See http://creativecommons.org/publicdomain/zero/1.0/). // ------------------------------------------------------------- // The following line may be omitted if you are not using NetBeans. package game; // This should match the name of your project import java.awt.event.ActionListener; import java.awt.event.ActionEvent; import java.awt.event.MouseListener; import java.awt.event.MouseEvent; import java.awt.Image; import java.awt.Graphics; import java.io.IOException; import java.io.File; import javax.imageio.ImageIO; import javax.swing.JFrame; import javax.swing.Timer; import javax.swing.JPanel; import javax.swing.JButton; class View extends JPanel { View(Controller c) { } public void paintComponent(Graphics g) { super.paintComponent(g); } } class Controller implements ActionListener { Controller() { } public void actionPerformed(ActionEvent e) { } } public class Game extends JFrame { public Game() { Controller c = new Controller(); View v = new View(c); setTitle("Untitled"); setSize(1000, 700); getContentPane().add(v); setDefaultCloseOperation(JFrame.EXIT_ON_CLOSE); setVisible(true); } public static void main(String[] args) { new Game(); } }Here are a few things to observe about this code:- Notice there is a licence at the top. If you don't like this license, feel free to remove it.
- The "package" line is only needed if you use NetBeans. It should match your project name.
- Whoa, there are a lot of "import" lines at the top of that code! What do they do? Not much, really. They just spare you from having to type the fully-qualified names of built-in classes. I put all those lines there so you wouldn't have to worry about them later.
- Notice that this code contains three classes.
- This code should build and run without any problems. (Try it, don't just take my word for it. Come on!)
- This program just makes an empty window. (Lame, right?)
- Notice that the Game class extends JFrame. In Java, "extends" lets you build on top of another class. The JFrame class actually contains all the code necessary to build a window. We are just building on top of that built-in code by using "extends". Methods like "setTitle", "setSize", "getContentPane", and "setVisible" are actually implemented in the JFrame class.
- Notice that the Controller class implements ActionListener. In Java, "implements" lets you make a class that provides some functionality. Our "Controller" class will provide the ability to respond to buttons.
- Now would be a really good time to ask lots of questions about this code. Learning is a treasure of great value. The fear of sounding dumb when you ask questions is an enemy who wants to steal your treasure. Protect your treasure. Do not let your enemy take it.
- Let's start hacking on this code by changing the window title and the window size.
Click to see the answer.
public class Game extends JFrame { public Game() { Controller c = new Controller(); View v = new View(c); setTitle("Untitled"); setSize(500, 500); getContentPane().add(v); setDefaultCloseOperation(JFrame.EXIT_ON_CLOSE); setVisible(true); } public static void main(String[] args) { new Game(); } } - Now, let's add a button to our window.
Here's some code to make a new button:
JButton b1 = new JButton("Push me");However, just because you make a new button, does not mean it will appear in the window. After you make a button, you have to add it to the window. Example:add(b1);
(The "add" method is part of the JPanel class.) So, see if you can figure out where to put this code to add a button to your window.Click to see the answer.
class View extends JPanel { View(Controller c) { JButton b1 = new JButton("Push me"); add(b1); } public void paintComponent(Graphics g) { super.paintComponent(g); } } - Next, let's make the button do something.
To do this, we need to tell the button which class is going to handle it.
Conveniently, our Controller already implements ActionListener, which means it knows how to handle buttons.
So, you just need to the button about the controller, like this,
b1.addActionListener(c);
and put some code in Controller.actionPerformed that does what you want.Click to see the answer.
class View extends JPanel { View(Controller c) { JButton b1 = new JButton("Push me"); add(b1); b1.addActionListener(c); } public void paintComponent(Graphics g) { } } class Controller implements ActionListener { Controller() { } public void actionPerformed(ActionEvent e) { System.out.println("You really know how to push my buttons."); } } - In Java, local variables can only be accessed inside the function where they are declared.
If you need to access a variable from another function, then you should use a member variable instead.
A member variable is declared inside the class, but outside of any function. Example:
class Avacado
{
	int member_variable;

	void makeGuacamole()
	{
		int local_variable;
	}
}
Don't use member variables for everything. It is better practice to use local variables whenever possible, and only use member variables when you have a reason. In this case, we have a reason: We are going to need to access the "view" from another function. So, please use a member variable to store the view.Click to see the answer.
public class Game extends JFrame { View view; public Game() { Controller c = new Controller(); view = new View(c); setTitle("Untitled"); setSize(1000, 700); getContentPane().add(view); setDefaultCloseOperation(JFrame.EXIT_ON_CLOSE); setVisible(true); } public static void main(String[] args) { new Game(); } } - Now, we can tell Java to repaint the screen by calling
view.repaint();
Modify your "Game" class to refresh the screen at regular intervals by adding the parts below in red. You will need to use a loop that runs forever. Have the computer sleep for 50 miliseconds after each time you repaint the screen. (You can reuse that take_a_nap function that we wrote previously.)Click to see the answer.
public class Game extends JFrame { View view; public Game() { Controller c = new Controller(); view = new View(c); setTitle("Untitled"); setSize(1000, 700); getContentPane().add(view); setDefaultCloseOperation(JFrame.EXIT_ON_CLOSE); setVisible(true); } static void take_a_nap(int miliseconds) { try { java.lang.Thread.sleep(miliseconds); } catch(Exception e) { e.printStackTrace(System.err); System.exit(1); } } public static void main(String[] args) { Game g = new Game(); while(true) { g.view.repaint(); // calls View.paintComponent take_a_nap(50); // sleeps for 50 miliseconds } } } - Build and run it. (It is a good practice to build after every little change that you make, just to catch any errors. Don't let errors build up!) You probably won't notice any difference in the program behavior, yet. Why not? Because it just keeps repainting the screen the same way.
- Let's add a member variable of type Image to your View class named turtle_image.
(You might search for "java Image" if you want to learn about the Image class.)
Again, build and run, just to make sure you didn't break anything. You still shouldn't notice any difference, yet.
Click to see the answer.
class View extends JPanel { JButton b1; Image turtle_image; View(Controller c) { b1 = new JButton("Push me"); b1.addActionListener(c); add(b1); } public void paintComponent(Graphics g) { super.paintComponent(g); } } - Right-click on this image of a turtle, and choose "Save Image As". Call it "turtle.png".

In the View constructor, load this image. Here is a snip of code to load an image:try { myimage = ImageIO.read(new File("filename.png")); } catch(Exception e) { e.printStackTrace(System.err); System.exit(1); }Before you use this snip of code, I recommend trying to search the Internet to see if you could have found it yourself. When you are proficient enough to find your own snips of code, then a "+10" will rise slowly over your head and fade out, indicating that your programming skills have just reached a new level of awesomeness!
Build and run your code, just to make sure you didn't break anything. You still shouldn't notice any difference, yet, but it's good to check that everything still builds.
Note that your IDE may not start in the directory where you think it starts. (In fact, they usually don't start where you want. I don't know why--they're all just annoying like that.) You can see which directory your IDE starts in by adding a line like this to your main method:System.out.println("Current dir: " + System.getProperty("user.dir"));Either, put your images there, or else modify the filename to specify a relative path.Click to see the answer.
class View extends JPanel { JButton b1; Image turtle_image; View(Controller c) { b1 = new JButton("Push me"); b1.addActionListener(c); add(b1); // Load the turtle image try { turtle_image = ImageIO.read(new File("turtle.png")); } catch(Exception e) { e.printStackTrace(System.err); System.exit(1); } } public void paintComponent(Graphics g) { super.paintComponent(g); } } - Now, add some code to draw the image.
The "Graphics" class in the Java class library contains the method you will need.
Use a search engine to learn about the Graphics class.
Look for a method in the Graphics class that sounds like it might be useful for drawing an image.
Click to see the answer.
class View extends JPanel { JButton b1; Image turtle_image; View(Controller c) { b1 = new JButton("Push me"); b1.addActionListener(c); add(b1); // Load the turtle image try { turtle_image = ImageIO.read(new File("turtle.png")); } catch(Exception e) { e.printStackTrace(System.err); System.exit(1); } } public void paintComponent(Graphics g) { super.paintComponent(g); g.drawImage(turtle_image, 0, 0, null); } } - Next, let's add a "Model" class to your code.
(You can look at the other classes, and make one like them, except named "Model".)
Here is an architectural diagram to clarify what we are trying to build, here:
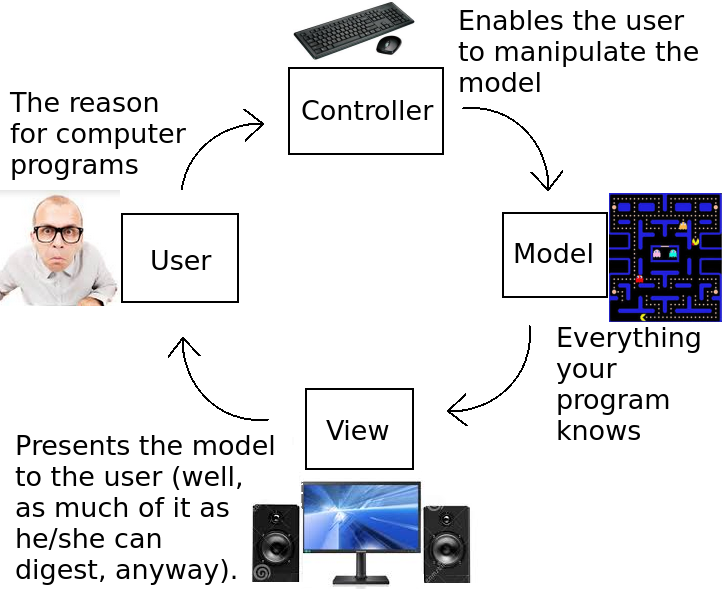
Click to see the answer.
// ------------------------------------------------------------- // The contents of this file are dedicated to the public domain. // (See http://creativecommons.org/publicdomain/zero/1.0/). // ------------------------------------------------------------- package game; import java.awt.event.ActionListener; import java.awt.event.ActionEvent; import java.awt.event.MouseListener; import java.awt.event.MouseEvent; import java.awt.Image; import java.awt.Graphics; import java.io.IOException; import java.io.File; import javax.imageio.ImageIO; import javax.swing.JFrame; import javax.swing.Timer; import javax.swing.JPanel; import javax.swing.JButton; class Model { Model() { } } class View extends JPanel { JButton b1; Image turtle_image; View(Controller c) { b1 = new JButton("Push me"); b1.addActionListener(c); add(b1); // Load the turtle image try { turtle_image = ImageIO.read(new File("turtle.png")); } catch(Exception e) { e.printStackTrace(System.err); System.exit(1); } } public void paintComponent(Graphics g) { super.paintComponent(g); g.drawImage(turtle_image, 0, 0, null); } } - Add variables for the horizontal and vertical position of the turtle to your Model class.
Click to see the answer.
class Model { int turtle_x; int turtle_y; Model() { } } - Make a new Model object in your Game constructor (where the View and Controller objects are made).
Click to see the answer.
public class Game extends JFrame { View view; public Game() { Controller c = new Controller(); view = new View(c); Model m = new Model(); setTitle("Untitled"); setSize(1000, 700); getContentPane().add(view); setDefaultCloseOperation(JFrame.EXIT_ON_CLOSE); setVisible(true); } static void take_a_nap(int miliseconds) { try { java.lang.Thread.sleep(miliseconds); } catch(Exception e) { e.printStackTrace(System.err); System.exit(1); } } public static void main(String[] args) { Game g = new Game(); while(true) { g.view.repaint(); // calls View.paintComponent take_a_nap(50); // sleeps for 50 miliseconds } } } - Add a member variable to the View that references the model,
and make the View draw the turtle where the model says the turtle belongs.
Click to see the answer.
class View extends JPanel { JButton b1; Image turtle_image; Model mod; View(Controller c, Model m) { mod = m; b1 = new JButton("Push me"); b1.addActionListener(c); add(b1); // Load the turtle image try { turtle_image = ImageIO.read(new File("turtle.png")); } catch(Exception e) { e.printStackTrace(System.err); System.exit(1); } } public void paintComponent(Graphics g) { super.paintComponent(g); g.drawImage(turtle_image, mod.turtle_x, mod.turtle_y, null); } } class Controller implements ActionListener { Controller() { } public void actionPerformed(ActionEvent e) { System.out.println("You really know how to push my buttons."); } } public class Game extends JFrame { View view; Model model; public Game() { Controller c = new Controller(); model = new Model(); view = new View(c, model); setTitle("Untitled"); setSize(1000, 700); getContentPane().add(view); setDefaultCloseOperation(JFrame.EXIT_ON_CLOSE); setVisible(true); } static void take_a_nap(int miliseconds) { try { java.lang.Thread.sleep(miliseconds); } catch(Exception e) { e.printStackTrace(System.err); System.exit(1); } } public static void main(String[] args) { Game g = new Game(); while(true) { g.model.update(); g.view.repaint(); // calls View.paintComponent take_a_nap(50); // sleeps for 50 miliseconds } } } - Add a method named Model.update, and call it just before you repaint the screen.
(For now, this method will not do anything.)
Click to see the answer.
class Model { int turtle_x; int turtle_y; Model() { } void update() { } } ... public class Game extends JFrame { View view; Model model; public Game() { Controller c = new Controller(); model = new Model(); view = new View(c, model); setTitle("Untitled"); setSize(1000, 700); getContentPane().add(view); setDefaultCloseOperation(JFrame.EXIT_ON_CLOSE); setVisible(true); } static void take_a_nap(int miliseconds) { try { java.lang.Thread.sleep(miliseconds); } catch(Exception e) { e.printStackTrace(System.err); System.exit(1); } } public static void main(String[] args) { Game g = new Game(); while(true) { g.model.update(); g.view.repaint(); // calls View.paintComponent take_a_nap(50); // sleeps for 50 miliseconds } } } - In Model.update, increment the horizontal position of the turtle.
Click to see the answer.
class Model { int turtle_x; int turtle_y; Model() { } void update() { turtle_x++; } } - Now, we finally have an animation!
Let's also change the background color.
To do that, you will need to use the Graphics.setColor and Graphics.fillRect methods.
Try using your favorite search engine to search for examples of how to use these methods.
Then, clear the view before you draw the turtle.
(You will also need to find the fully-qualified name of the Color class, so you can import it.)
Click to see the answer.
import java.awt.Color; class Model { int turtle_x; int turtle_y; Model() { } void update() { turtle_x++; } } class View extends JPanel { JButton b1; Image turtle_image; Model mod; View(Controller c, Model m) { mod = m; b1 = new JButton("Push me"); b1.addActionListener(c); add(b1); // Load the turtle image try { turtle_image = ImageIO.read(new File("turtle.png")); } catch(Exception e) { e.printStackTrace(System.err); System.exit(1); } } public void paintComponent(Graphics g) { super.paintComponent(g); g.setColor(Color.cyan); g.fillRect(0, 0, 500, 500); g.drawImage(turtle_image, mod.turtle_x, mod.turtle_y, null); } } - Now that the turtle can move around, let's give the user some control over it.
The mouse might be a good way to control it, so let's start by reading about the the MouseListener interface.
So, open your favorite search engine, and type "java MouseListener".
(If you prefer to use the keyboard, you could read about the KeyListener interface.)
After you read about it, make your Controller class implement this interface.
Click to see the answer.
class Controller implements ActionListener, MouseListener { Controller() { } public void actionPerformed(ActionEvent e) { System.out.println("You really know how to push my buttons."); } public void mousePressed(MouseEvent e) { } public void mouseReleased(MouseEvent e) { } public void mouseEntered(MouseEvent e) { } public void mouseExited(MouseEvent e) { } public void mouseClicked(MouseEvent e) { } } public class Game extends JFrame { View view; Model model; public Game() { model = new Model(); Controller c = new Controller(); view = new View(c, model); view.addMouseListener(c); setTitle("Untitled"); setSize(1000, 700); getContentPane().add(view); setDefaultCloseOperation(JFrame.EXIT_ON_CLOSE); setVisible(true); } static void take_a_nap(int miliseconds) { try { java.lang.Thread.sleep(miliseconds); } catch(Exception e) { e.printStackTrace(System.err); System.exit(1); } } public static void main(String[] args) { Game g = new Game(); while(true) { g.model.update(); g.view.repaint(); // calls View.paintComponent take_a_nap(50); // sleeps for 50 miliseconds } } } - Give your Controller a reference to the Model.
Click to see the answer.
class Controller implements ActionListener, MouseListener { Model mod; Controller(Model m) { mod = m; } public void actionPerformed(ActionEvent e) { System.out.println("You really know how to push my buttons."); } public void mousePressed(MouseEvent e) { } public void mouseReleased(MouseEvent e) { } public void mouseEntered(MouseEvent e) { } public void mouseExited(MouseEvent e) { } public void mouseClicked(MouseEvent e) { } } public class Game extends JFrame { View view; Model model; public Game() { model = new Model(); Controller c = new Controller(model); view = new View(c, model); view.addMouseListener(c); setTitle("Untitled"); setSize(1000, 700); getContentPane().add(view); setDefaultCloseOperation(JFrame.EXIT_ON_CLOSE); setVisible(true); } static void take_a_nap(int miliseconds) { try { java.lang.Thread.sleep(miliseconds); } catch(Exception e) { e.printStackTrace(System.err); System.exit(1); } } public static void main(String[] args) { Game g = new Game(); while(true) { g.model.update(); g.view.repaint(); // calls View.paintComponent take_a_nap(50); // sleeps for 50 miliseconds } } } - When the user clicks the mouse, tell the turtle to travel to the location where the user clicked.
Example snip of code that you will need:
public void mousePressed(MouseEvent e)
{
	// Control the turtle
	model.setDestination(e.getX(), e.getY());
}
Click to see the answer.
// ------------------------------------------------------------- // The contents of this file are dedicated to the public domain. // (See http://creativecommons.org/publicdomain/zero/1.0/). // ------------------------------------------------------------- import java.awt.event.ActionListener; import java.awt.event.ActionEvent; import java.awt.event.MouseListener; import java.awt.event.MouseEvent; import java.awt.Image; import java.awt.Graphics; import java.io.IOException; import java.io.File; import javax.imageio.ImageIO; import javax.swing.JFrame; import javax.swing.Timer; import javax.swing.JPanel; import javax.swing.JButton; class Model { int turtle_x; int turtle_y; int dest_x; int dest_y; Model() { } void update() { if(turtle_x < dest_x) turtle_x++; if(turtle_x > dest_x) turtle_x--; if(turtle_y < dest_y) turtle_y++; if(turtle_y > dest_y) turtle_y--; } void setDestination(int dx, int dy) { dest_x = dx; dest_y = dy; } } class View extends JPanel { JButton b1; Image turtle_image; Model mod; View(Controller c, Model m) { mod = m; b1 = new JButton("Push me"); b1.addActionListener(c); add(b1); // Load the turtle image try { turtle_image = ImageIO.read(new File("turtle.png")); } catch(Exception e) { e.printStackTrace(System.err); System.exit(1); } } public void paintComponent(Graphics g) { super.paintComponent(g); g.drawImage(turtle_image, mod.turtle_x, mod.turtle_y, null); } } class Controller implements ActionListener, MouseListener { Model mod; Controller(Model m) { mod = m; } public void actionPerformed(ActionEvent e) { System.out.println("You really know how to push my buttons."); } public void mousePressed(MouseEvent e) { // Control the turtle mod.setDestination(e.getX(), e.getY()); } public void mouseReleased(MouseEvent e) { } public void mouseEntered(MouseEvent e) { } public void mouseExited(MouseEvent e) { } public void mouseClicked(MouseEvent e) { } } public class Game extends JFrame { View view; Model model; public Game() { model = new Model(); Controller c = new Controller(model); view = new View(c, model); view.addMouseListener(c); setTitle("Untitled"); setSize(1000, 700); getContentPane().add(view); setDefaultCloseOperation(JFrame.EXIT_ON_CLOSE); setVisible(true); } static void take_a_nap(int miliseconds) { try { java.lang.Thread.sleep(miliseconds); } catch(Exception e) { e.printStackTrace(System.err); System.exit(1); } } public static void main(String[] args) { Game g = new Game(); while(true) { g.model.update(); g.view.repaint(); // calls View.paintComponent take_a_nap(50); // sleeps for 50 miliseconds } } } - That was good practice, but now please undo the previous change. That is, please remove the "destination" variables. We will not be using those anymore.
- Make the turtle fall by simulating gravity.
This is done by adding a member variable of type "double" to your Model class to represent the turtle's vertical velocity.
In Model.update, add the vertical velocity to the turtle's vertical position, and add a small constant value to the turtle's vertical velocity.
(1.5 might be a good value. Larger values will cause it to fall faster. Smaller values will cause it to fall slower.)
Now, your turtle should fall off the bottom of the screen, like a rock.
Click to see the answer.
class Model { int turtle_x; int turtle_y; double vert_vel; Model() { } void update() { vert_vel += 1.5; turtle_y += vert_vel; } } - Enable the turtle to jump/fly. When the user clicks the mouse, set the turtle's vertical velocity to a constant negative value.
(-18 might be a good value. More negative values will cause it to jump higher each time you click.)
Click to see the answer.
class Model { int turtle_x; int turtle_y; double vert_vel; Model() { } void update() { vert_vel += 1.5; turtle_y += vert_vel; } void onClick() { vert_vel = -18; } } class View extends JPanel { JButton b1; Image turtle_image; Model mod; View(Controller c, Model m) { mod = m; b1 = new JButton("Push me"); b1.addActionListener(c); add(b1); // Load the turtle image try { turtle_image = ImageIO.read(new File("turtle.png")); } catch(Exception e) { e.printStackTrace(System.err); System.exit(1); } } public void paintComponent(Graphics g) { super.paintComponent(g); g.drawImage(turtle_image, mod.turtle_x, mod.turtle_y, null); } } class Controller implements ActionListener, MouseListener { Model mod; Controller(Model m) { mod = m; } public void actionPerformed(ActionEvent e) { System.out.println("You really know how to push my buttons."); } public void mousePressed(MouseEvent e) { mod.onClick(); } public void mouseReleased(MouseEvent e) { } public void mouseEntered(MouseEvent e) { } public void mouseExited(MouseEvent e) { } public void mouseClicked(MouseEvent e) { } } - This would make more sense if we replace the turtle with a bird. Here are a couple of pictures you could use:


(It would be even more awesome if you drew your own pictures with your favorite painting program. Or, you could use a picture of your face. But don't use the President's face--that would be disrespectful.) - Keep your code clean. If you are using a bird now, then the word "turtle" should probably not appear in any of your variable names.
Click to see the answer.
class Model { int bird_x; int bird_y; double vert_vel; int time_since_flap; Model() { } void update() { vert_vel += 1.5; bird_y += vert_vel; time_since_flap++; } void onClick() { vert_vel = -18; time_since_flap = 0; } } class View extends JPanel { JButton b1; Image bird_image1; Model mod; View(Controller c, Model m) { mod = m; b1 = new JButton("Push me"); b1.addActionListener(c); add(b1); // Load the bird image try { bird_image1 = ImageIO.read(new File("bird1.png")); } catch(Exception e) { e.printStackTrace(System.err); System.exit(1); } } public void paintComponent(Graphics g) { super.paintComponent(g); g.drawImage(bird_image1, mod.bird_x, mod.bird_y, null); } } - Load both bird images into your View. (We will use both of them in the next step.)
Click to see the answer.
class View extends JPanel { JButton b1; Image bird_image1; Image bird_image2; Model mod; View(Controller c, Model m) { mod = m; b1 = new JButton("Push me"); b1.addActionListener(c); add(b1); // Load the bird images try { bird_image1 = ImageIO.read(new File("bird1.png")); bird_image2 = ImageIO.read(new File("bird2.png")); } catch(Exception e) { e.printStackTrace(System.err); System.exit(1); } } public void paintComponent(Graphics g) { super.paintComponent(g); g.drawImage(bird_image1, mod.turtle_x, mod.turtle_y, null); } } - Make the bird flap when you click the mouse. The flapping image should last for about 4 or 5 frames after you click, then return to the other image.
This change will require you to make multiple simultaneous edits. Let's see if you can do it!
Click to see the answer.
class Model { int turtle_x; int turtle_y; double vert_vel; int time_since_flap; Model() { } void update() { vert_vel += 1.5; turtle_y += vert_vel; time_since_flap++; } void onClick() { vert_vel = -18; time_since_flap = 0; } } class View extends JPanel { JButton b1; Image bird_image1; Image bird_image2; Model mod; View(Controller c, Model m) { mod = m; b1 = new JButton("Push me"); b1.addActionListener(c); add(b1); // Load the bird images try { bird_image1 = ImageIO.read(new File("bird1.png")); bird_image2 = ImageIO.read(new File("bird2.png")); } catch(Exception e) { e.printStackTrace(System.err); System.exit(1); } } public void paintComponent(Graphics g) { super.paintComponent(g); if(mod.time_since_flap < 5) g.drawImage(bird_image2, mod.turtle_x, mod.turtle_y, null); else g.drawImage(bird_image1, mod.turtle_x, mod.turtle_y, null); } } - Let's load some obstacles for the bird to fly over and under.
Here are some images you can use:


Click to see the answer.
class View extends JPanel { JButton b1; Image bird_image1; Image bird_image2; Image tube_image1; Image tube_image2; Model mod; View(Controller c, Model m) { mod = m; b1 = new JButton("Push me"); b1.addActionListener(c); add(b1); // Load the bird images try { bird_image1 = ImageIO.read(new File("bird1.png")); bird_image2 = ImageIO.read(new File("bird2.png")); tube_image1 = ImageIO.read(new File("tube1.png")); tube_image2 = ImageIO.read(new File("tube2.png")); } catch(Exception e) { e.printStackTrace(System.err); System.exit(1); } } public void paintComponent(Graphics g) { super.paintComponent(g); if(mod.time_since_flap < 5) g.drawImage(bird_image2, mod.turtle_x, mod.turtle_y, null); else g.drawImage(bird_image1, mod.turtle_x, mod.turtle_y, null); } } - And, let's draw the tube.
Click to see the answer.
class Model { int bird_x; int bird_y; double vert_vel; int time_since_flap; int tube_x; int tube_y; Model() { tube_x = 200; tube_y = 300; } void update() { vert_vel += 1.5; bird_y += vert_vel; time_since_flap++; } void onClick() { vert_vel = -18; time_since_flap = 0; } } class View extends JPanel { JButton b1; Image bird_image1; Image bird_image2; Image tube_image1; Image tube_image2; Model mod; View(Controller c, Model m) { mod = m; b1 = new JButton("Push me"); b1.addActionListener(c); add(b1); // Load the bird images try { bird_image1 = ImageIO.read(new File("bird1.png")); bird_image2 = ImageIO.read(new File("bird2.png")); tube_image1 = ImageIO.read(new File("tube1.png")); tube_image2 = ImageIO.read(new File("tube2.png")); } catch(Exception e) { e.printStackTrace(System.err); System.exit(1); } } public void paintComponent(Graphics g) { super.paintComponent(g); // Draw the bird if(mod.time_since_flap < 5) g.drawImage(bird_image2, mod.bird_x, mod.bird_y, null); else g.drawImage(bird_image1, mod.bird_x, mod.bird_y, null); // Draw the tube g.drawImage(tube_image2, mod.tube_x, mod.tube_y, null); } } - Make the tube start on the right side of the screen and move toward the left.
When it reaches the left side, make it teleport to the right side again
(so it feels like your bird is flying forward.)
Click to see the answer.
class Model { int bird_x; int bird_y; double vert_vel; int time_since_flap; int tube_x; int tube_y; Model() { tube_x = 200; tube_y = 300; } void update() { // Move the bird vert_vel += 1.5; bird_y += vert_vel; time_since_flap++; // Move the tube tube_x -= 8; if(tube_x < -100) tube_x = 500; } void onClick() { vert_vel = -18; time_since_flap = 0; } } - Our Model is starting to get rather complex.
Let's clean it up by breaking it into separate classes for the Bird and the Tube.
Click to see the answer.
class Bird { int x; int y; double vert_vel; int time_since_flap; void update() { vert_vel += 1.5; y += vert_vel; time_since_flap++; } void flap() { vert_vel = -18; time_since_flap = 0; } } class Tube { int x; int y; Tube() { x = 200; y = 300; } void update() { x -= 8; if(x < -100) x = 500; } } class Model { Bird bird; Tube tube; Model() { bird = new Bird(); tube = new Tube(); } void update() { bird.update(); tube.update(); } void onClick() { bird.flap(); } } class View extends JPanel { JButton b1; Image bird_image1; Image bird_image2; Image tube_image1; Image tube_image2; Model mod; View(Controller c, Model m) { mod = m; b1 = new JButton("Push me"); b1.addActionListener(c); add(b1); // Load the bird images try { bird_image1 = ImageIO.read(new File("bird1.png")); bird_image2 = ImageIO.read(new File("bird2.png")); tube_image1 = ImageIO.read(new File("tube1.png")); tube_image2 = ImageIO.read(new File("tube2.png")); } catch(Exception e) { e.printStackTrace(System.err); System.exit(1); } } public void paintComponent(Graphics g) { super.paintComponent(g); // Draw the bird if(mod.bird.time_since_flap < 5) g.drawImage(bird_image2, mod.bird.x, mod.bird.y, null); else g.drawImage(bird_image1, mod.bird.x, mod.bird.y, null); // Draw the tube g.drawImage(tube_image2, mod.tube.x, mod.tube.y, null); } } - When the tube teleports to the right side of the screen, set its vertical position to a random value.
(You will need to use the "Random" class to do this.)
Click to see the answer.
class Tube { static Random rand = new Random(); int x; int y; Tube() { x = 200; y = 300; } void update() { x -= 8; if(x < -100) { x = 500; y = rand.nextInt(400) + 100; } } } - Implement collision detection.
Here is some pseudocode that might be helpful:
boolean isColliding(Bird bird, Tube tube)
{
	if(bird.right_side < tube.left_side)
		return false;
	if(bird.left_side > tube.right_side)
		return false;
	if(bird.top > tube.bottom)
		return false;
	if(bird.bottom < tube.top)
		return false;
	return true;
}
Click to see the answer.
class Tube
{
	static Random rand = new Random();
	int x;
	int y;

	Tube()
	{
		x = 200;
		y = 300;
	}

	void update(Bird bird)
	{
		x -= 8;
		if(x < -100)
		{
			x = 500;
			y = rand.nextInt(400) + 100;
		}

		if(doesCollide(bird))
			System.out.println("CRASH!");
	}

	boolean doesCollide(Bird b)
	{
		int bird_width = 64;
		int bird_height = 57;
		int tube_width = 55;
		int tube_height = 400;
		if(b.x + bird_width < x)
			return false;
		if(b.x > x + tube_width)
			return false;
		if(b.y > y + tube_height)
			return false;
		if(b.y + bird_height < y)
			return false;
		return true;
	}
}


class Model
{
	Bird bird;
	Tube tube;

	Model()
	{
		bird = new Bird();
		tube = new Tube();
	}

	void update()
	{
		bird.update();
		tube.update(bird);
	}

	void onClick()
	{
		bird.flap();
	}
}