Debuggers and Iterators
- Install Eclipse (if it is not already installed).
Eclipse is an Integrated Development Environment (IDE).
Translation: Eclipse is a big bloated tool that helps you write java programs.
It is integrated with the Java compiler. It compiles in the background and instantly identifies errors.
It includes a debugger, and many tools that you will never use.
If you use Ubuntu,
sudo apt-get install eclipse
On my machine, Eclipse crashed when I ran it for the first time. I Googled for the solution, and found
this.
The highly-rated solution worked for me.
If you use Windows, Google for "eclipse download", and go from there.
(The first time you run Eclipse, you will need to tell it where you want to store your work, and close an annoying "welcome" page.)
Q: "I am already comfortable with NetBeans or some other IDE. Can I just use my favorite IDE instead?"
A: School is for learning new things. However, yes, you may sabotage your learning by using the tools of your choice, but only if you really learn how to use them--No whining
about how NetBeans has forced you to put your code in some weird directory hierarchy and you can't figure out how to build it using shell commands.
- Learn how to open your program in Eclipse:
Run Eclipse.
Click on "File->new->project". Choose "Java Project", and click "Next".
Uncheck the box next to "Use default location".
Click "Browse".
Select the folder that contains your map editor.
Click "Finish".
(If it asks if it is okay to open an associated perspective, click "Remember my decision", and "Yes".)
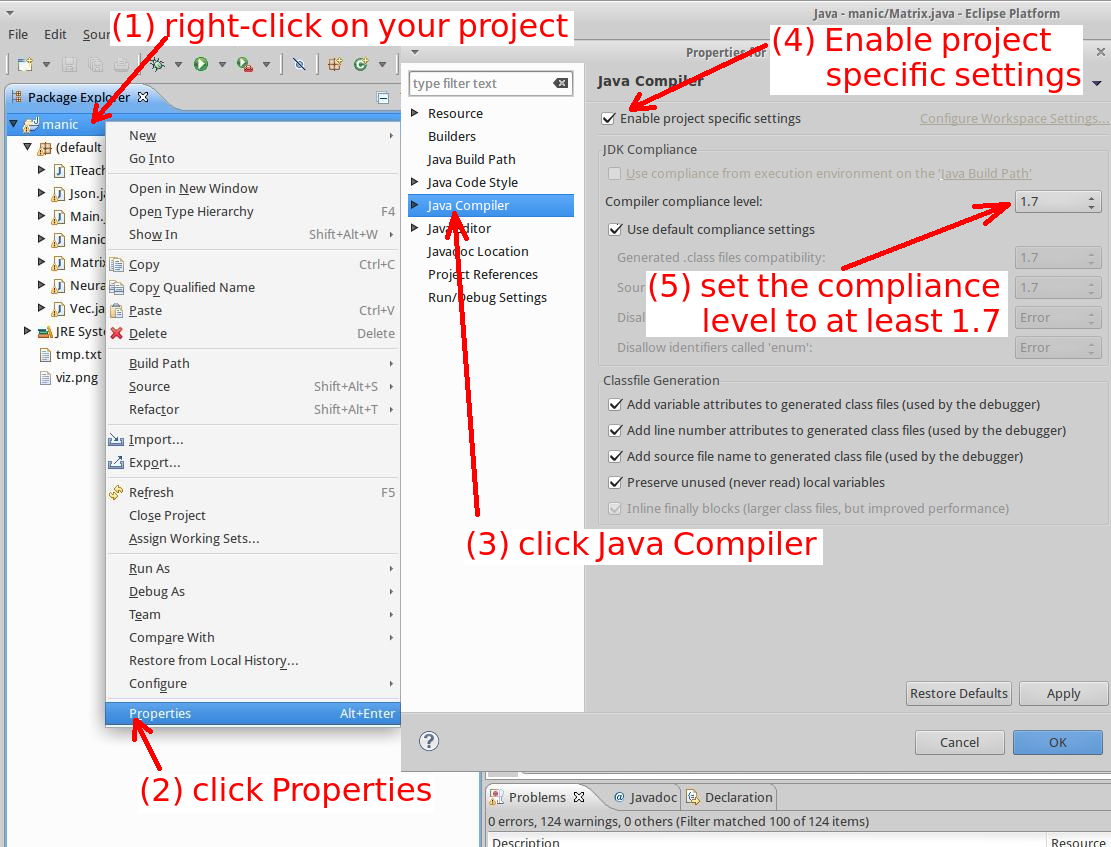
- Set up Eclipse to use a non-ancient version of Java:
(Use the scroll-bars to view the right-side of the image above.)
Note that you must do this for EVERY project that you do in Eclipse.
- Set a breakpoint:
In your Controller.mouseClicked method, add some code that says
		if(e.getY() < 100)
		{
			System.out.println("break here");
		}
Save your changes (Ctrl-S).
Then, set a breakpoint on the line that prints "break here": Right-click in the margin to the left of that line, and click on "Toggle breakpoint".
A blue dot should appear in the margin by that line.
- Trigger your breakpoint:
Click on the debug icon (it looks like a bug) to begin debugging your program.
If it asks you to select a way to debug it, choose "Java Application", not "Java Applet".
Now, when you click near the top of the page, your breakpoint will trigger.
If it asks you to confirm a perspective switch, click "Remember my decision", and "Yes".
- Look around:
The "Debug" window contains the call stack.
(It tells which method called which method until it arrived at your breakpoint.)
The "Variables" window tells you the current values in your variables.
(Note that the contents of this window changes, depending on which frame of the call stack you select.)
The Console window contains the output of your program.
(It is currently empty, because your program hasn't printed anything yet.)
Click on the "Step over" button (F6).
Now, it should print "break here" to the console window.
If you see windows for "Outline" or "Welcome", just close them.
Notice that your program is now frozen.
That is because you have stopped at your breakpoint.
Now, remove the breakpoint, then click on "Resume" (the green triangle button).
The program will continue running.
Now you should know how to attach a debugger to your program, and stop at any point (because you can put the breakpoint wherever you want),
under any condition (because you can change the "if" statement to any condition you want).
When you are done debugging, just close the IDE, and make sure you can still build your code from the command line.
In this class, you must be able to code with and IDE.
You must also be able to code without an IDE.
And, you must be able to switch back and forth between the two approaches without much difficulty.
You should not be afraid to open an IDE when you need to do some debugging.
However, IDEs seem to break themselves at random times.
If your IDE breaks, and you don't know how to write code without it, I will have no sympathy for you.
- Start a side-scroller video game.
Copy your map editor program.
Add a class for Mario, and add an instance of Mario to your Model.
Add some code to the View to draw Mario.
Here are some pictures you can use. (If you prefer, you can draw your own, or find some images you like better.)


When the user presses the arrow keys, cycle through the images so that Mario is animated.
(Mario should not keep running when the user stops pressing the arrow keys.)
An array would be a good structure for holding images. Example:
class View
{
	Image[] mario_images;

	View()
	{
		mario_images = new Image[5];
		mario_images[0] = loadImage("mario1.png");
		mario_images[1] = loadImage("mario2.png");
		mario_images[2] = loadImage("mario3.png");
		mario_images[3] = loadImage("mario4.png");
		mario_images[4] = loadImage("mario5.png");
	}
}
(The implementation of the "loadImage" method in this example is not shown.)
- Add gravity.
Add a "double" member variable to store Mario's vertical velocity. Example:
class Mario
{
	int x;
	int y;
	double vert_vel;
}
If you haven't already, add a method named "update" to your Mario class, and make Model.update call Mario.update.
Simulate physics:
	void update()
	{
		vert_vel += 1.2;
		y += vert_vel;
	}
- Make the ground stop Mario from falling.
Example code:
		if(y > 500)
		{
			vert_vel = 0.0;
			y = 500; // snap back to the ground
		}
Adjust the constant values to your liking.
Oh yeah, we should probably draw the ground too:
		g.setColor(Color.gray);
		g.drawLine(0, 596, 2000, 596);
Also, add code to detect when there is a Tube beneath Mario.
Mario should not pass through Tubes (either horizontally or vertically).
Here is some pseudocode that will return true iff two rectangles, a and b, overlap:
if(a.right_side < b.left_side)
	return false;
if(a.left_side > b.right_side)
	return false;
if(a.bottom_side < b.top_side) // assumes bigger is downward
	return false;
if(a.top_side > b.bottom_side) // assumes bigger is downward
	return false;
return true;
When Mario collides with a Tube, how do you know whether he should snap to above or before it?
One way is to check whether his previous position was above or before it.
- Enable Mario to jump.
Add a counter that counts the number of frames since Mario stood on solid ground.
(Increment this counter in Mario.update. Set it to zero when Mario stands on solid ground.)
If this counter is less than 5 and the space bar is pressed, accelerate upward by subtracting 5 from Mario's vertical velocity.
(Please adjust these numbers to your liking.)
Mario should jump higher if you hold the space bar longer, but he should not be able to jump from mid-air.
- Use an iterator somewhere in your program.
Study the Java API doc about ArrayList.
Note that the ArrayList class inherits an "iterator()" method from its super class (the class it extends).
Learn how to use an iterator, and use one somewhere in your program.
- Use lazy-loading with all the images.
Use static member variables in your Mario and Tube classes to hold their corresponding images.
Initialize them to null.
In the constructor for these classes, if the image is null, load the image.
Thus, no image should ever be loaded more than once, no matter how many times the class is instantiated.
And, if some class is never instantiated, its image should never be loaded.
FAQ:
- Q: Eclipse is doing something wierd. What should I do?
A: The class forum would be a good place to ask about software issues.
Since software often changes, there is a good chance I don't even know the answer.
Also, you are probably not the only one who needs to hear the answer.
- Q: The animation is rather jerky. How can I make it smoother?
A: I added a member variable of type java.awt.Robot to my Game class. In Game.actionPerformed, I call Robot.mouseWheel(0).
That seems to trick Java into thinking the mouse is doing something, so it refreshes a bit faster.
- Q: I'm getting an IIOException that says "Can't read input file!". What should I do?
Make sure you know what directory you are executing within.
Here is a command to print the current working directory:
System.out.println("cwd=" + System.getProperty("user.dir"));
If you are running inside an IDE, the problem is probably caused by the IDE starting in an unexpected folder.
The solution is to tell the IDE what folder to start in.
Eclipse <sarcasm>conveniently</sarcasm> places this setting in project->properties->Run/Debug Settings->Default configuration->Edit->Arguments->Working Directory->Other.
- Q: I'm getting an error about incompatible types. What is the problem?
A: If your code looks like this,
Iterator it = tubes.iterator();
change it to
Iterator<Sprite> it = tubes.iterator();
- Q: Where can I get help?
A: You can try the automated professor.
You can ask on the class forum.
You can ask the grader.
You can e-mail the grader.
You can show up to my office hours.
You can ask Google, Siri, or Alexa.
You could search for a tutorial on Java.
You could buy and read the book.
- Q: How does one use a try/catch block?
A: If you must use a try/catch block, make sure the catch part does not hide any errors.
A good way to inform the user about an error is to print a stack trace and terminate the program.
(If you don't terminate the program, you might not even notice that something bad happened.)
Here is an example of a well-crafted try/catch block:
try
{
	bird.image = ImageIO.read(new File("tube.png"));
}
catch(Exception e)
{
	e.printStackTrace(System.err);
	System.exit(1);
}
Here is an example of the wrong way to use a try/catch block:
try{
	bird.image = ImageIO.read(new File("tube.png"));
} catch(Exception e) {}   // BAD, BAD, BAD!!!!!!
Also, it is a good idea to put as little code as you can inside the try section.
- Q: I want to add sound effects, just for fun. How would I do that?
A: The "AudioSystem" class enables sound effects.
One difficulty that occurs with the AudioSystem class is that it can only play one sound clip at a time.
To work around this issue, here is a class I made that loads multiple copies of a single sound effect,
then alternates among them when you play it.
So, if you have a sound that rarely occurs, one copy may be sufficient.
If you have a sound that you plan to play in rapid succession, you might want 3 or 4 copies for it to alternate among when playing the sound:
	class MySoundClip {
		Clip[] clips;
		int pos;

		MySoundClip(String filename, int copies) throws Exception {
		  clips = new Clip[copies];
		  for(int i = 0; i < copies; i++) {
		    AudioInputStream inputStream =
		    AudioSystem.getAudioInputStream(new File(filename));
		    AudioFormat format = inputStream.getFormat();
		    DataLine.Info info =
		      new DataLine.Info(Clip.class, format);
		    clips[i] = (Clip)AudioSystem.getLine(info);
		    clips[i].open(inputStream);
		  }
		  pos = 0;
		}

		void play() {
			clips[pos].setFramePosition(0);
			clips[pos].loop(0);
			if(++pos >= clips.length)
				pos = 0;
		}
	}
|